There are different ways of installing a lace frontal closure with Brazilian Hair such as bonding, attaching by use of clips or fully sewing in. the technique of sewing in a lace frontal closure is very essential to make the hair wig appear more natural and give you the confidence that comes from a charming and fabulous look.
However, most people have not yet mastered all the necessary tips in this technique and that is why this article shares very important tips in regards to sew-in lace closure the right way.
Sew In Lace Frontals And Brazilian Hair For A Beginner
It is quite easy to install lace frontals for customers who use them every day but if you are a beginner, you might need assistance from designers.
Different stylists use different techniques to come up with the same results. All these techniques, tips and tricks aim at installing a lace frontal securely. They can be used interchangeably or omit some steps altogether. Whichever the way, the results should come out fabulous.
The Most Popular Method For Installing A Lace Closure
As mentioned earlier, lace closure frontal can be installed by bonding or with the use of clips. More so, the most popular method for installing a lace closure is sewing down the back of the frontal and using a bonding agent to glue the front hairline down. From there, the rest of the weave is installed around the frontal.

Another option would be fully clipping the lace frontal closure or fully sewn in. just like the first option, the rest of the weave is installed around the lace frontal.
Remember to clean your hair properly because you will be wearing your Brazilian human hair for some time. Make sure your hair and scalp are freshly washed. Use some sort of clarifying shampoo, a conditioner and moisturize your hair afterward. Ensure that your hair dries properly before you proceed.
Below are three different methods so that you can choose the one that suits you best:
Method One – How To Sew-In Brazilian Hair And Closure Look More Natural

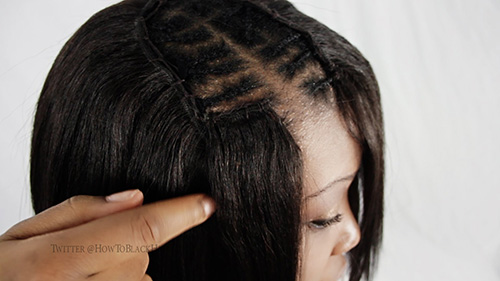
Cornrow your hair and part your hair where you want your final style to be parted. Cornrow your hair and make sure that each braid comes out of that particular part you have chosen. To have a flat foundation, you need to have small braids.
Remember a flat foundation plays a big part in your overall look of the sew-in virgin Brazilian remy hair and closure thus making it appear more natural. Take your lace closure and position it over your part and make sure that the straight edge is aligned with your front hairline.
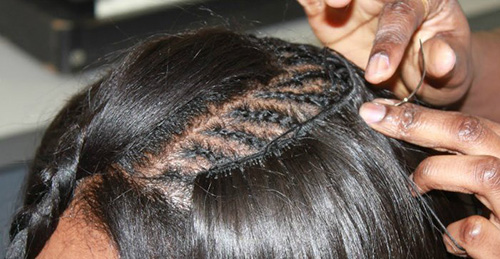
Apart from your closure being flat, you should also ensure that there is no space left between the closure and your natural hair. Take the left side of the closure down to the cornrow along your hairline. Thread a curved needle with thick, sturdy thread. Push the needle down through the lace, the netting, and the cornrow. Pull the needle back out through the cornrow and the netting. Make sure it is just below the edge of the lace closure.
How To Using Curved Needle To Sew In Brazilian Hair And Closure
To ensure a proper closure, repeat this process a few more times until you feel its firm enough. Leave the needle threaded and to avoid losing it, hook it through the netted cap. If you are a beginner, seek help from a friend or someone with experience.
Use the second needle to track down the right side of the closure and thread another curved needle with more thick, sturdy thread. Pull the lace closure taut against your hairline and tack down the right side. At the front edge of the closure, create a horizontal part.
Comb the Brazilian hair weave on the lace closure forward to reveal the lace netting using a rat-tail comb. Sew down the front of the lace closure and start sewing from the left side of the closure going to the part. Sew your way back to the side edge. Repeat the same on the right side as well. Remember not to sew across the part on the lace closure. A straight stitch or back stitch is quite useful in this stage.
How To Sewing Through The Wig Cap
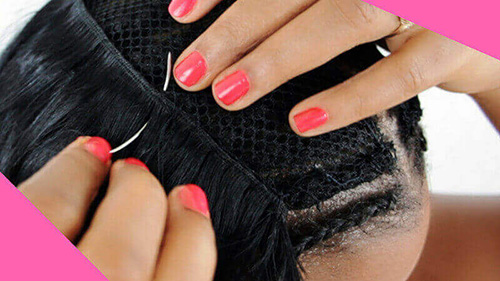
Make sure you are sewing through the wig cap netting and the cornrow underneath it. At this point, hook the right needle through the netting and keep both the needles threaded. This stage is very important, whipstitch your way along each side of the closure.
Finish the back-center and sew on the left side of the lace closure. Repeat the same on the right side and finish the sewing at the back where you left off. Knot the two threads together and trim off the excess. If you come across a cornrow, sew it through as well. Gently twist the hair on the lace closure and secure it with a clip.
Method Two – How To Full Sew In Brazilian Hair Weave With Closure No Leave Out
In a bonded frontal closure installation, none of your hair will be left out. This is because the piece is meant to create a natural hairline. In instances where the Lace Frontal Closure is fully sewn or clipped, your hairline might be left out because the unit is installed just behind the hairline.
- The first step is to braid the pattern and place the hair closure where you want it to be. Use an invisible needle and thread.
- One that will seem to disappear as you sew.
- Stitch the hair closure on the side down and then stitch on the other side down.
- Remember to place the hair closure about a centimeter on your hairline as you stitch it.
To Make Sure That Your Closure Is Properly Installed
As you continue, pay more attention to your hairline, you should see the closure being put flatter and flatter on your hair. To make sure that your closure is properly installed, put the needle in front of the braid, under the braid and out of the braid repeatedly.
Method Three – Sew In Brazilian Hair With Closure From Front To Back

Alternatively, braid the Brazilian hair in parallel format from front to back, place the weave on the head and feel out the braids and part around the head. Line the hair up right where you want it to be and use hairpins to pin it in place. From there, begin to sew right above the temples, down and around to the other side. However, note that there is no thread right on the very top and so you should avoid that as well.
To make sure the lace is very flat, take the needle under the braid and it will force the lace to lay down flat. After you are done with sewing, flip up the edges and apply your adhesive. You are now done and good to go.